


There are about a million tutorials online for this project...BUT for the sake of building up my blog I thought I'd show ya how I do it :)
Supplies You'll Need
56- 63 size Diapers ( I use size 1)
lots of small rubber-bands and a couple large ones
receiving blanket(optional)
ribbon: at least 1 inch think
embellishments: flowers/buttons/bows
56- 63 size Diapers ( I use size 1)
lots of small rubber-bands and a couple large ones
receiving blanket(optional)
ribbon: at least 1 inch think
embellishments: flowers/buttons/bows
hot glue gun/glue
wooden dowel
wooden dowel
*I use size 1 diapers so the recipient can "enjoy" the cake for a while before having to use the diapers. You can use whatever size you'd like, it will turn out the same :)
*You'll need 56 diapers if you want to use the receiving blanket for the top, and 63 if you want the entire cake to be diapers. Totally up to you.
*Get creative with decorating! Try replacing some of the diapers with wash cloths, rattles, bottles, bows, pacifiers, soap, shampoo, race cars...ANYTHING! It's fun to play around a little!
*Please excuse my rug/floor for the back-drop. I do a lot of my crafting on the floor where my kids are when they're awake. ;)
*For the small rubber-bands I picked some hair ties up at the dollar store, I got the flowers there too! The dollar store is a great place for the little extras like shampoo, powder...
*For a resourceful new mommy, she can use the ribbon for making hair bows, and the flowers to make clips. It's a gift that keeps giving!
Here we GO:
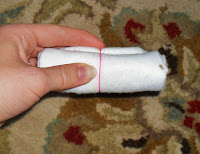
1.The prep work:
*Start from the top of the diaper (where it opens) and roll it tightly until you get to the end, then wrap a small rubber-band around to hold it securely. Repeat with ALL diapers :)


 2."Baking" your cake:
* Once you have all your diapers done, start putting the "cake layers" together by grouping them in a circle with a large rubber-band to hold them all in place. Start the group with 1 in the middle, and 6 around(that will make the top layer).

 *This^ would be enough for the top layer. This below is how you start the next layer, just add another circle of diapers. For the bottom layer add yet another round of diapers.

All 3 completed layers. Top layer=7 diapers Middle=19, and Bottom=37
 You'll need the wooden dowel to hold the cake together, it's up to you if you want to put it in now or later.

Make it your own:
3. When your "cake" is done, it's time to embellish. You should have large rubber-bands holding the cake together. Start by measuring
Wrap the ribbon around the cake layers, with a slight overlap (for gluing together) and cut the ribbon accordingly.
 Using your hot glue gun, place a dab of glue on the end of the ribbon, wrap around the rubber-band (pretty tight so it stays) and close the ribbon. Be careful not to get the glue on the diapers :)
 I decided to use a receiving blanket for the top layer of this cake.
 To add flowers, take the flower apart and glue the pieces together individually, that way it will be flush with the ribbon.
 Add the flowers where you want them, and put your dowel in to hold the layers in place.
 I wrapped washcloths around a few of the diapers, and replaced a couple with baby wash and a rattle.
 Isn't it pretty!?!
 Hope this helps :)
*Brittney*


 2."Baking" your cake:
* Once you have all your diapers done, start putting the "cake layers" together by grouping them in a circle with a large rubber-band to hold them all in place. Start the group with 1 in the middle, and 6 around(that will make the top layer).

 *This^ would be enough for the top layer. This below is how you start the next layer, just add another circle of diapers. For the bottom layer add yet another round of diapers.
All 3 completed layers. Top layer=7 diapers Middle=19, and Bottom=37
 You'll need the wooden dowel to hold the cake together, it's up to you if you want to put it in now or later.
Make it your own:
3. When your "cake" is done, it's time to embellish. You should have large rubber-bands holding the cake together. Start by measuring
Wrap the ribbon around the cake layers, with a slight overlap (for gluing together) and cut the ribbon accordingly.
 Using your hot glue gun, place a dab of glue on the end of the ribbon, wrap around the rubber-band (pretty tight so it stays) and close the ribbon. Be careful not to get the glue on the diapers :)
 I decided to use a receiving blanket for the top layer of this cake.
 To add flowers, take the flower apart and glue the pieces together individually, that way it will be flush with the ribbon.
 Add the flowers where you want them, and put your dowel in to hold the layers in place.
 I wrapped washcloths around a few of the diapers, and replaced a couple with baby wash and a rattle.
 Isn't it pretty!?!
 Hope this helps :)
*Brittney*
So cute! Elenna's teacher is pregnant and the moms are thinking about doing a shower for her. I'll have to make one of these. I think she'll love it! :)
ReplyDeleteSo cute! I've always wanted to make one. Maybe I will now! :)
ReplyDeleteCrazy Crafty Cousins
I used this tutorial as well! Thanks so much!
ReplyDeleteI made the diaper cake for a shower I went to yesterday. Another girl also made a diaper cake, but she said that she couldn't figure how to get the diapers to stay together, so she glued them. I was so happy to have found your blog with directions for this before I took the same route! :-)
Love all of your tutorials. Thanks so much for posting them!